How to Add Indicators on TradingView: A Comprehensive Guide
TradingView is a powerful platform for traders and investors, offering a wide range of tools and features to analyze financial markets. Among its many features, adding indicators is a fundamental aspect of technical analysis.
In this guide, we’ll delve into the process of how to add indicators on TradingView, step by step. Whether you’re a beginner or an experienced trader, mastering this skill can enhance your trading strategies and decision-making process.
Understanding Indicators
Before we dive into the steps of adding indicators, it’s essential to understand what indicators are and how they work. Indicators are mathematical calculations based on historical price and volume data.
They help traders identify trends, momentum, volatility, and potential reversal points in the market. TradingView offers a vast library of built-in indicators, as well as the ability to create and customize your own.
Step 1: Accessing the Chart
The first step is to log in to your TradingView account and access the chart you want to analyze. Once logged in, navigate to the “Charts” tab, where you can either create a new chart or open an existing one. Select the desired trading pair or asset class, and the chart will appear on your screen.
Step 2: Opening the Indicator Panel
Once the chart is displayed, look for the “Indicators” button located at the top of the chart window. Clicking on this button will open the Indicator Panel, where you can find a wide range of built-in and custom indicators. The Indicator Panel is divided into categories such as Trend, Oscillators, Volume, and Custom.
Step 3: Choosing an Indicator
In the Indicator Panel, browse through the different categories and select the indicator you want to add to your chart. You can either scroll through the list or use the search bar to find a specific indicator.
TradingView offers popular indicators such as Moving Averages, Relative Strength Index (RSI), MACD, Bollinger Bands, and many more.
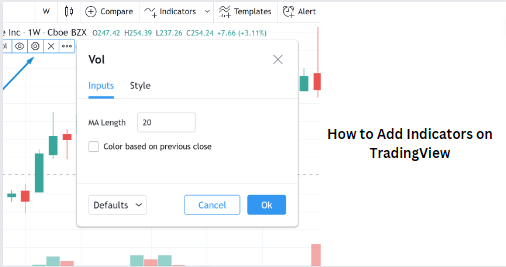
Step 4: Adding the Indicator to the Chart
Once you’ve chosen an indicator, click on its name to add it to the chart. A settings window will appear, allowing you to customize the indicator’s parameters such as period, color, and style.
Adjust the settings according to your preferences and trading strategy, then click “OK” to apply the indicator to the chart.
Step 5: Interpreting the Indicator
After adding the indicator to the chart, it will appear as an overlay or a separate pane, depending on the indicator type. Take some time to familiarize yourself with the indicator’s signals and how they behave in different market conditions. Understanding the interpretation of the indicator is crucial for making informed trading decisions.
Step 6: Removing or Editing the Indicator
If you wish to remove or edit the indicator, simply right-click on it and select the appropriate option from the context menu. You can edit the indicator’s parameters, change its appearance, or remove it from the chart altogether.
Step 7: Exploring Advanced Features
TradingView offers advanced features for customizing and enhancing your analysis with indicators. Experiment with features such as multiple time frame analysis, overlaying multiple indicators, and creating custom indicator scripts. These features allow you to tailor your analysis to your specific trading style and preferences.
How Adding Indicators on TradingView Can Help You
Adding indicators on TradingView is a fundamental skill for any trader or investor looking to analyze financial markets effectively. By following the steps outlined in this guide, you can easily add, customize, and interpret indicators to enhance your trading strategies.
Remember to experiment with different indicators and settings to find what works best for you. With practice and experience, you’ll become proficient in using indicators to make informed trading decisions. Happy tr