DIY Delight: Crafting Custom Window Clings
Custom window clings offer a versatile and creative way to personalize spaces, promote businesses, or celebrate special occasions. These decorative decals adhere to windows using static electricity, making them easy to apply, remove, and reposition without leaving residue or damaging surfaces.
While purchasing custom window clings from retailers is a common option, many craft enthusiasts may wonder: Can you make your own window clings?
In this blog, we’ll explore the world of DIY window clings, discussing techniques, materials, and tips for creating custom designs that add flair to any window.
Understanding Custom Window Clings
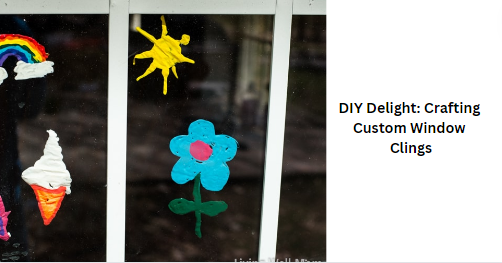
Custom window clings, also known as window decals or window stickers, are adhesive-free decals made from thin vinyl material.
Unlike traditional stickers, custom window clings adhere to surfaces using static electricity, allowing them to cling securely to glass, mirrors, and other smooth surfaces without the need for adhesive.
These clings are popular for home decor, business signage, promotional materials, and temporary decorations due to their ease of use and versatility.
Can You Make Your Own Window Clings?
Yes, you can create your own custom window clings using a few simple materials and techniques. DIY window clings offer endless possibilities for creativity, allowing you to design and customize clings to suit your preferences, themes, and occasions.
Whether you’re a seasoned crafter or a beginner, making your own window clings can be a fun and rewarding project. Here’s how to get started:
Materials Needed
To make your own custom window clings, you’ll need the following materials:
i Clear Vinyl Sheets: Clear vinyl sheets serve as the base material for your window clings. These sheets are available at craft stores or online retailers and come in various sizes and thicknesses.
i Acrylic Paints or Markers: Acrylic paints or markers are used to create designs on the vinyl sheets. Choose vibrant colors that will stand out against the background of your windows.
i Paintbrushes or Fine-Tip Markers: Paintbrushes or fine-tip markers are essential for creating intricate designs and details on the vinyl sheets.
i Scissors or Craft Knife: Scissors or a craft knife will be used to cut out the shapes and designs of your window clings.
i Clear Contact Paper: Clear contact paper is used to protect the painted designs and provide a smooth surface for adhering the window clings to your windows.
Steps to Make DIY Window Clings
Follow these steps to create your own custom window clings:
1. Prepare the Vinyl Sheets: Cut the clear vinyl sheets to the desired size for your window clings. Make sure the sheets are clean and free of any dust or debris.
2. Create Your Designs: Use acrylic paints or markers to create your designs directly onto the vinyl sheets. Experiment with different colors, shapes, and patterns to achieve the desired look for your window clings.
3. Allow the Paint to Dry: Let the painted designs dry completely before proceeding to the next step. This may take several hours, depending on the thickness of the paint and the complexity of the designs.
4. Cut Out the Clings: Once the paint is dry, use scissors or a craft knife to carefully cut out the shapes and designs of your window clings. Take your time and work carefully to ensure clean, precise cuts.
5. Apply Clear Contact Paper: Cut pieces of clear contact paper slightly larger than your window clings. Carefully peel off the backing of the contact paper and place it adhesive-side down over the painted designs on the vinyl sheets. Smooth out any air bubbles or wrinkles.
6. Trim the Excess Contact Paper: Use scissors or a craft knife to trim away the excess contact paper around the edges of your window clings, leaving a small border of contact paper around each cling.
7. Apply to Windows: Peel the window clings off the vinyl sheets and carefully press them onto your windows, starting from one corner and smoothing out any air bubbles as you go. The static electricity will help the clings adhere securely to the glass surface.
Tips for Making DIY Window Clings
Here are some helpful tips to keep in mind when making your own custom window clings:
1. Experiment with Designs: Get creative and experiment with different designs, colors, and techniques to create unique window clings that reflect your personality and style.
2. Use Thin Layers of Paint: When painting designs onto the vinyl sheets, use thin layers of paint to prevent the clings from becoming too thick or heavy. Allow each layer to dry completely before adding additional layers.
3. Test Adhesion: Before applying your window clings to all your windows, test them on a small area to ensure they adhere securely and can be easily removed without leaving residue or damage.
4. Store Clings Properly: To preserve the longevity of your custom window clings, store them flat in a cool, dry place when not in use. Avoid folding or creasing the clings, as this can affect their adhesion and appearance.
DIY window clings offer a fun and creative way to customize your windows and express your personal style. With just a few simple materials and techniques, you can create custom designs that add a pop of color and personality to any space.
Whether you’re decorating for a special occasion, promoting your business, or simply adding a touch of whimsy to your home, making your own window clings is a rewarding and enjoyable project.